Air Circulation in Garage Diy Easy Garage Ventilation Solutions
I've had garage ventilation on my mind for some time now. Between Eileen and I always doing projects in the garage, we produce a lot of fumes from painting and staining.
Cutting wood in there also throws a lot of sawdust into the air. Even when I work on the mower and other small engines in there, the smell of gasoline lingers.
On nice days when it's not raining, we leave the garage door open and sometimes even put a fan to help exhaust the air.
However, this was not the ideal solution.

Many painting and staining projects would sit in the garage overnight filling the air with fumes, just to be aired out when the sun came up and when we can open the garage doors.
Aside from the noxious odors sitting in the garage the next morning, it would also delay the completion of these projects.
A better solution had to be devised for garage ventilation.
To add to the pressure, I recently acquired a snow blower for the upcoming winter snowstorms, and that was bound to leave the garage filled with gasoline odors after usage. Even more reason to look into garage ventilation systems.
Garage Vent Fan
So I put my thinking cap on and wandered around the garage looking for ventilation ideas.
I knew I wanted to set up some type of fan that would exhaust the air, so I was looking for areas in the garage that would be an ideal location.
In my previous home, I used to run a lot of computer equipment in the garage that would produce a lot of heat. I had researched garage venting options back then and settled on a small fan and vent that could be installed directly in the garage door (via a small hole that you cut).
This solved my problem of exhausting the heat, but had an unfortunate side effect. During the winter, the garage door vent would let all the cold air in and drop the garage temperature below the freezing point, wreaking havoc on my paints and other liquids that were not meant to be frozen.
The garage door vents and exhaust option left a bad taste in my mouth ever since, and I was determined not to pursue that direction again. Also, to properly exhaust the size of my current garage, I would need a much larger fan and hole to make the job worthwhile.
Making A Plan For Ventilating The Garage
I finally settled on a way of venting the garage. I would find an ideal venting location in the garage, and cut a large square hole in the wall (roughly 14"x14" in between the wall studs).
Then I would install self-closing shutter vents on both the interior and exterior of the wall. Finally, on the inside, I would install a powerful exhaust fan to ventilate the garage. The double shutter vents were going to be key in helping to keep the cold air outside during the winter.
I did a lot of research on exhaust fans and decided on one with built-in shutters. I purchased a 14" diameter fan capable of 800 CFM.
No wiring was needed with this particular model because it just plugs into an outlet. I already had a wireless switch ready for it too, so I could activate it from the other side of the garage. For the exterior wall, I went a 14" aluminum shutter vent.
With the hardware identified, I looked for an ideal location for the vent. The best location would have been above one of the garage doors, but for aesthetics, I didn't want the vent to be visible from the street.
So I went with a wall that faced the rear of the house. It would be practically invisible but still serve its purpose.
Here's the location I chose inside for the garage exhaust fan:
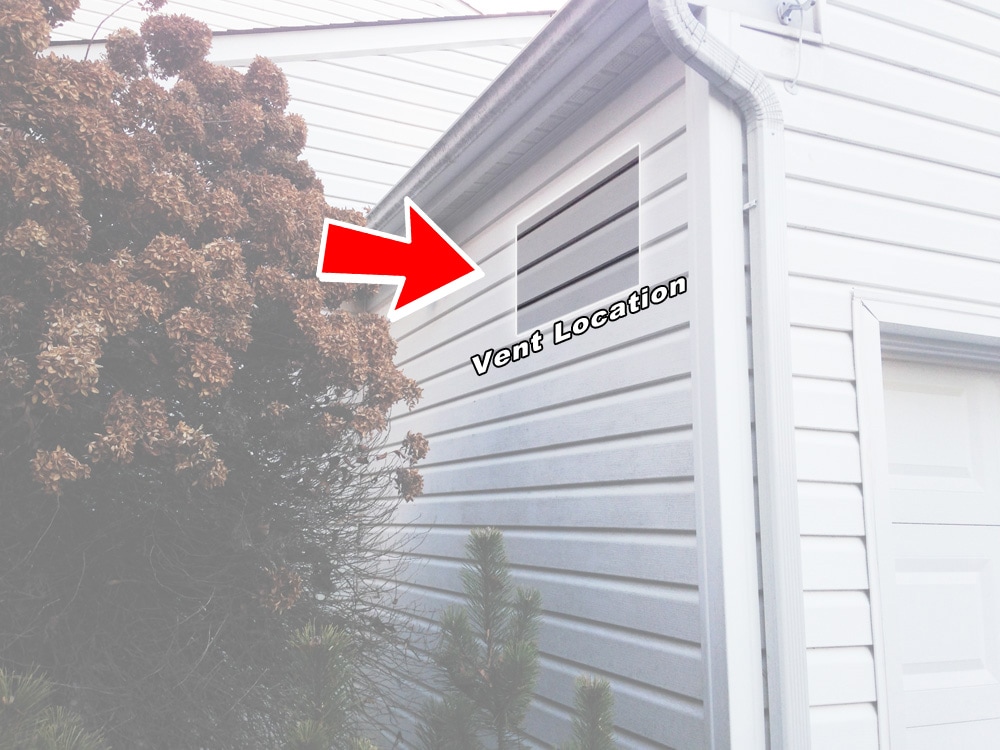

Here's where the vent would exhaust outside:
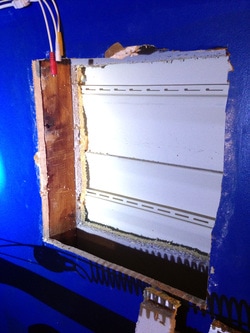
Preparing To Install The Garage Exhaust Vent
Above, you'll see the first layer I went through was the drywall. Then I had 2 layers of insulating foam.
Next was the white vinyl siding. I left this intact for now while I awaited the shipment of the exterior vent.
The cutout got a little rough at some of the edges, but it was not a big deal. The fan would cover all the edges, and hide any irregularities in my cut.
Next, I had to seal the top and bottom edges of the hole.
This was a necessary step to prevent the fan from venting air into the wall. I simply cut two pieces of 2x4s, inserted them in the top and bottom, and attached to the wall studs using some pocket hole screws (with the help of my Kreg Pocket Hole jig).
I put temporary hooks into the 2x4s to make it easier to maneuver them.
Here's one of the 2x4s ready to be inserted:

Here's a picture of the bottom of the hole, sealed in with the 2×4:

Next I inserted the exhaust fan to make sure it fit properly:

A few days later, the exterior shutter vent arrived and I resumed work on the project.
Constructing A J Channel Frame
Cutting a hole through the wall meant that I had to be careful to make the exterior side waterproof. I couldn't just cut a hole in the siding, insert the vent, and call it a day.
To keep water from penetrating the siding, I needed to use J channel. This would allow me to create a frame around the vent that would overlap the siding and shield the rough-cut edges from water.
Here is a picture showing 4 pieces of J channel cut to make the vent frame:

This was actually my first time working with J channel, so I had to do some research online to see how to make the cuts on the ends (important to prevent water from seeping in).
I followed some great instructions on FamilyHandyMan.com (under the section "Install J-channel around the window").
Here's a picture showing the assembled J channel pieces wrapping around the vent:

Preparing The Siding For The Exhaust Fan
Now came the fun task of working with the siding.
To properly install the exterior vent, I needed access to the wall underneath the siding, which meant removing several pieces of siding. This was a learning process as I went along (I did all my research, so I was confident in the task at hand).
With the help of a siding removal tool, I was able to easily detach some siding, and pull it away from the wall.
With enough of the siding out of the way, I was able to continue work on the hole.
To help with the waterproofing, I used some flashing tape (leftover from my shed project) to seal in the edges of the hole.
Here's a picture showing the flashing tape in action:

In the event that water did make its way through the siding, the flashing tape would ensure that the water couldn't seep behind the exposed edges of the foam insulation.
Installing The Garage Vent
Next, I inserted the shutter vent and nailed it in the wall studs. Here's a picture showing some progress:

With the garage vent in place, I attached the J channel frame, overlapping the rough cut edges of the vinyl siding.
Here's a close-up showing the finished outside wall with J channel:

Looks very professional, doesn't it? It should be very watertight too.
Here's a picture showing the vent from the inside:

Installing The Exhaust Fan
I was nearing the end of the project of putting vents in the garage. I inserted the exhaust fan in the hole and was getting ready to screw it into the studs.
Then, I decided to check the vents on the fan to make sure they opened and closed properly.
They opened fine. Unfortunately, they had trouble closing.
They would stick on the way down and not close all the way. This was bothersome because a partially open vent meant cold drafts coming in.
After some fiddling, I discovered that the hole I cut was too snug of a fit for the fan frame.
It was distorting the frame ever so slightly to cause the shutters to not close properly. If I pulled the fan about 2 inches out from the wall, the shutters worked fine.
So the solution was simple.
MAKING A FRAMED WOODEN SPACER FOR THE GARAGE WALL EXHAUST FAN
I would built a 2×4 wooden frame between the wall and the fan, to give the exhaust fan enough distance from the hole for the shutters to operate properly.
I literally spent only 10 minutes on this task – I chopped some 2x4s to length with the miter saw.
Then I attached them to each other with pocket hole screws to form a frame.
Finally, I used some lag bolts (countersunk with a forstner bit) to attach the frame to the wall studs.
Here's a picture of the garage wall exhaust fan frame (the pocket holes are hidden on the other side):

At last, the exhaust fan could be bolted to the wall.
I pressed the fan against the 2×4 frame and made sure the shutters opened and closed freely. Then I attached the fan to the 2x4s with some heavy-duty screws.
My garage vent was now completed. I stood back, admired my handiwork and then fired up the exhaust fan with my wireless switch.
As the fan speed increased to full, both the inside and outside shutters opened to exhaust the garage. The fan was not that loud either (it was barely audible outside the garage).
Here's a picture of the mounted garage wall exhaust fan (powered on) from the inside:

Here's a picture of the outside of the garage wall exhaust fan, showing the vents open with the fan on:

I'm very excited about our new garage exhaust fan. I already used it this past weekend with great success.
We had a mild snow shower (about 4 inches), and so I broke out the snowblower to try it out.
As predicted, when I finished clearing out the snow from the driveway and put away the snowblower in the garage, the still-warm engine started to stink up the garage.
I engaged the new exhaust fan for a few hours, and the garage was back to normal.
I can't wait to see what the fan does when the garage is full of sawdust in the air.
The total cost of putting the vent fan in the garage was around $150 and was collectively about a day's worth of work. If you are in need of exhaust fans in the garage, this tutorial will have your new garage wall exhaust fan up and running in no time!
Garage Vent Fan Update – Two Years Later
I was really pleased with the garage vent fan. It runs great and really airs the garage out nicely.
However, I did add one more thing to our garage vent fan.
I had been manually turning the fan on and off as needed. Sometimes I left it running longer than I anticipated.
So I wanted a better system of turning the fan off. I ended up purchasing an electronic timer switch and plugged the fan into it.
Now, I just press a button for how long I'd like the fan to run and it runs for just that duration.

Source: https://www.justmeasuringup.com/garage-ventilation/
Post a Comment for "Air Circulation in Garage Diy Easy Garage Ventilation Solutions"